
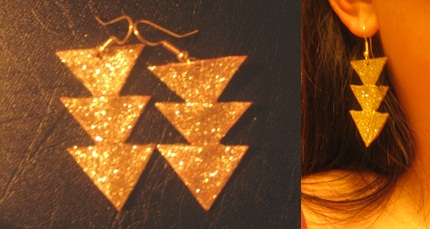
Im so excited to share this finally... I am absolutely in love with my new Geometric gold earring.
They turned out so amazing! I got the inspiration from a necklace on pinterest that I came across. I immediately wanted to try to make earrings kind of similar. The necklace is from urbanoutfitters.

How 2 instructions
Supplies

Steps

1. Take one of the pieces (The clay is usually cut already into 4 sections so most likely you only need 1 of the 4 sections) of the gold colored clay, and cut it in half with the clay knife (be careful with this knife). I used gold color clay because it was easier to paint, but use whatever color you want to use. Kneed the clay so its more manageable. Flat the clay out pretty thin, if its too thick the triangles will not look right laying over each other. However, if the clay is too thin it will break. I used my mod podge bottle as a rolling pin!
2. Next cut the rolled clay in 1/2 like the picture above shows in image 2.
3. Next use your knife and cut a shape of a triangle from the 1/2 clay piece. I placed the cut egde of the clay piece down to form the bottom of the triangle and then cut the sides. repeat this until you have a total of 6 pieces. Make sure they are somewhat symmetrical and around the same size. Use your best judgement of the size of the triangles. Dont make them tooo big because there are going to be 3 on one side. Make the size of the triangles to fit your liken, if you like big earrings then go for bigger triangles. Dont make big triangles if you dont like big earrings.
4. Next place your triangles on top of the other triangles like picture 4. put a slight bit of pressure because you want the triangles to stick to each other, but dont put too much pressure that they start losing their shape.I liked the points of the triangle facing down and I liked 3 triangles, however you can use more triangles and face them the other way if you prefer.
5. Once both pairs are done they will look like this. Take a toothpick or push pin and make a small hole in the top part of the clay for the earring hooks. Make sure you dont make them too big because it will deform the triangle shape.
6. Next bake the earrings at 275 degrees for about 15 mins. remove the clay and let cool.
7. Take whatever kind of paint you want and paint your earrings (I used glitter paint). I did about 4 coats. Then just for some added glitter I used more glitter on top and covered the glitter with mod modge to keep the glitter from falling off and getting everywhere. Let it dry.
8. Next take ur earring hooks and crip them in the hole that was made by the toothpick.
and Viola!
The earrings are perfect and I will definitley be making some more soon! Endless opportunitys with this and next Im going to do the same thing but try circles!

No comments:
Post a Comment